Template setup
To use WriterXG, you first need to configure the template settings for your account. You might also need to revisit some configuration windows when you add new templates, change printers, add template descriptions, etc. Access to the WriterXG screens can be limited using ServiceXG roles and profile security when WriterXG configurations exist in a system administration session.
To learn more about WriterXG, see WriterXG.
The first step in setting up your templates is working with the Template Configuration screen. When you first receive WriterXG, it comes preloaded with the base templates (see Best practice templates), but you'll need to complete the template configuration for each template based on your office setup.
Access Template Configuration
Go to: Home > System Administration > WriterXG > Template Configuration
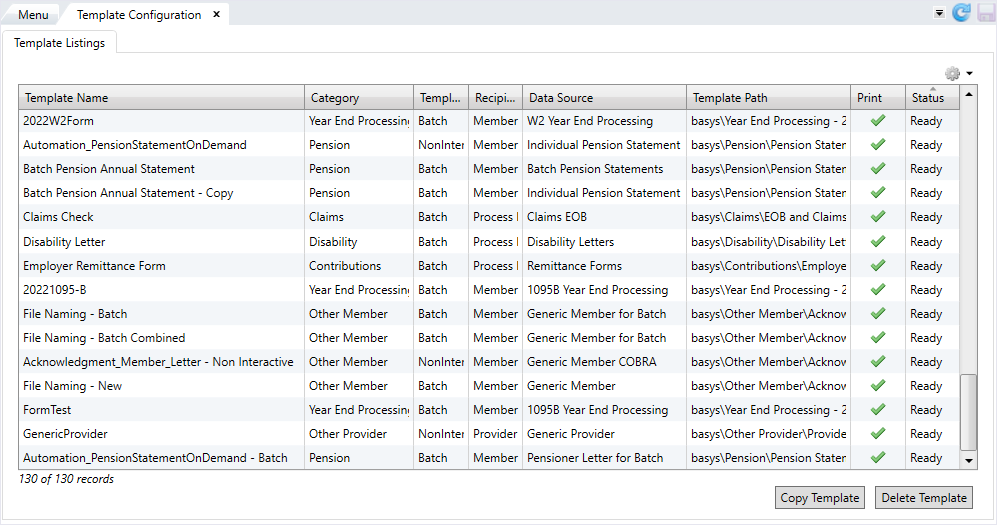
Template Configuration contains the Template Listings tab, which lists all of your office’s templates. From here, you can view and manage your existing templates and their status, including the ability to quickly copy templates and delete any old or unused templates. See Copy a template and Delete a template for more information.
Double-click a specific template to open it in a separate tab.
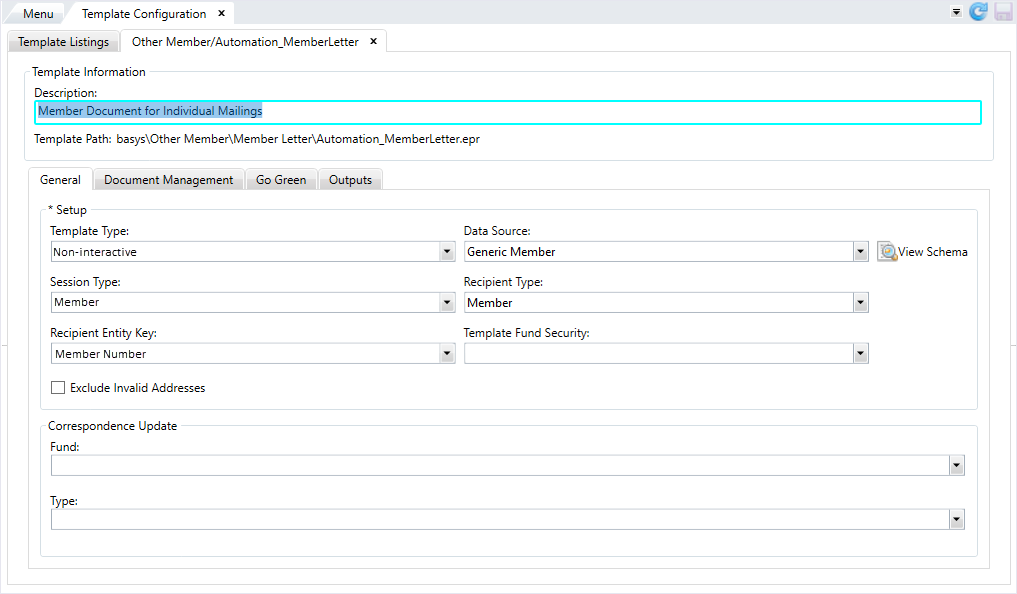
On this tab, you can configure the settings for the template on multiple subtabs:
General—Update or provide the data source, session type, recipient type, recipient entity key, and any needed correspondence information. TheCorrespondence Updateinformation determines how the correspondence, if any, is recorded within theCorrespondencemodule. The operator will see these options while creating a letter. You must have active document management credentials to update theCorrespondencetab.Document Management—If you have a document management system (e.g. OnBase, PaperVision, AppExtender, etc.), set up categorization and search information for each template. You must have active document management credentials to update theDocument Managementtab.Go Green—If you have a MemberXG GoGreen solution (paperless delivery option), optionally set up email and delivery options for your members that have opted to receive email. Members will receive an email that their document is available to view in MemberXG at the delivery time you configure. If you haven't purchased the GoGreen solution, you won't see this subtab.Outputs—Define what happens to the generated statement. The options are toOutputto a PDF,Printto a printer, or send toECM Only.
See Configure a template to begin the configuration process.
* indicates a required field
| Field | Type | Description |
|---|---|---|
| Template Listings Tab | ||
| Template Name | View-only | The name of the template. |
| Category | View-only | The folder in Ecrion that groups the batch, interactive, and non-interactive templates (e.g. Annuity, Claims, Dependent, Disability, Member, Year End, Other, etc.). A starter set of categories is provided with each setup. |
| Template Type | View-only |
|
| Recipient Type | View-only |
The default receiver for the document. Options include Employer, Member, Dependent, Process Driven, and Provider. A Process Driven Recipient Type indicates that the CDO process determines the recipient type. |
| Data Source | View-only | This is how we plug and play our Data Sets into the basys platform, whether it’s individual or batch. |
| View-only | A Output or Print (if you select ECM Only, this doesn’t display). |
|
| Status | View-only |
The current state of the template:
|
| Template Information | ||
| Description | Text box | The description of the template. |
| Template Path | View-only | The directory path to the template file on the Ecrion website. |
| General Subtab | ||
| Template Type* | List | Select the template type for the template above. See Template Type above. |
| Data Source* | List | This is how we plug and play our Data Sets into the basys platform, whether it’s individual or batch. |
| View Schema | Button | Displays the content of the data source in a pop-up window. |
| Session Type* | List |
The type of session from which the data is derived:
The session type is inherited from the selected data source and the default option automatically displays . |
| Recipient Type* | List |
This is who receives the document. The options include:
|
| Recipient Entity Key* | List | The entity key is the item that identifies the recipient in the Data Source. This field is inactive (dimmed) if the Recipient Type is set to Process Driven (CDO). |
| Template Fund Security | List | Lists all funds in the system. Associating a fund to the template will only allow those with access to that fund to access the template. |
| Exclude Invalid Addresses | Check box | Select this check box to exclude any recipients with invalid addresses from this template. No letters are printed for recipients with invalid addresses, but PDFs and ECM images are still generated. |
| Correspondence Update | ||
| Fund | List | The fundCorrespondence module. |
| Type | List | This option is required after selecting a Fund. This is the correspondence type related to the Fund selected. Examples include, PEN ALERT, Phone Call, CORR Update, etc. |
| Document Management Subtab | ||
| Review and Approve Document | Check box | Indicates the document won't be released until it's approved by an operator. See Document review process. |
| Type Group | List | The first level of the hierarchy for documents in the document management system. In other words, a Document Group contains Document Types which contains keywords. For example, a group type could be Checks. |
| Type | List | A description for the document type within the document group. An example of a document type could be Pension Check or Annuity Check. |
| Keyword ID / Name | View-only | A search term or index which aid in finding or organizing the document in your ECM. Examples could include, Claim Ref#, Date, Member Name, SSN#, etc. |
| XML Tag | List | Keyword tag for the document that exists in the data source. An example would be <Mem_Number>Member Number</Mem_Number>. |
| ID Type | List | This is an additional (optional) identifier for the Keyword and XML Tag in the document management system. Classification for keyword if needed. |
| Go Green Subtab | ||
| Send Email Notification | Check box | Indicates if an email will be sent to members informing them that their document is available in the MemberXG portal. |
| Subject | Text box | This is the email subject that will display on the email sent to the member to let them know their document is available in MemberXG. This field is required if you selected the Send Email Notification check box. |
| Spanish Subject | Text box | The Spanish language email subject that will display on the email sent to the member to let them know their document is available in MemberXG. |
| Delivery Instruction | List |
Indicates the time when the notification email will be delivered to the member. Examples include instantly (every minute), nightly (at or around the middle of the night on a daily basis), 5pm weeknights, or weekly (kicking off a weekend run process on a Friday evening to run potentially all weekend). This list can vary depending on your setup. If a template is part of the review and approve process and hasn’t been approved, the delivery option will be impacted. A document is held until it’s approved. |
| Outputs Subtab | ||
| Output | Radio button | Button that determines the settings for PDF output. |
| Radio button |
Button that determines the settings for a physical printer. After selecting this button, a list displays options for the printer tray:
|
|
| ECM Only | Radio button | Only active if you have a document management system. Button that indicates the output will be sent as an image to your document management system only. |
| Use Advanced Options | Check box | Displays the options for file naming, including keywords to include in a file name. |
| Combine Batch PDFs | Check box |
Combines the batch PDFs into one file rather than multiple PDFs when generating documents from the Note: This check box only displays when the template type is set to Batch.
|
| Output Option - Use Advanced Options | ||
| File Naming | Text box |
Enter the name of the output file using free form text and any keywords from the |
| File Name Keyword | List | The list of keywords to add to the file name. Examples include operator, template name, date, and time stamps. |
| Output Option - Combine Batch PDFs (available for batch templates) | ||
| File Name | View-only | The name of the file. |
| Sort 1 | View-only | Lists the sort tag, sort type, and sort order chosen for the sort 1 row. |
| Sort 2 | View-only | Lists the sort tag, sort type, and sort order chosen for the sort 2 row. |
| Sort 3 | View-only | Lists the sort tag, sort type, and sort order chosen for the sort 3 row. |
| Combine PDF | View-only | A green check mark indicates that PDFs will be combined. |
| Sort Enabled | View-only | A green check mark indicates that you’ve configured the sort options. |
| File Naming | Text box | Enter the name of the output file using free form text and any keywords from the File Name Keyword list. |
| File Name Keyword | List | The list of keywords to add to the file name. Examples include operator, template name, and date stamps. |
| Sort Tag | List | The tag by which the file will be sorted. This field consists of the same options listed in the Recipient Entity Key. Each sort tag must contain a sort order and sort type. You can add up to three sort criteria for the template. This field doesn’t contain any items that are a part of a data source’s grouping. |
| Sort Order | List |
The order in which the file will be sorted:
|
| Sort Type | List |
The character type by which the file will be sorted:
|
| Print Option | ||
| Print List | List | Select to print with a Single Tray or Multi Tray. |
| Printer ID | List |
Select the network printer ID for the selected template output. The printer ID displays when generating a letter, but can’t be changed at that time. RedCard displays as an option if you use RedCard to print documents. Documents with the |
| Print Two-Sided | Check box |
The template will print on both sides (front and back) of the page. This setting doesn’t change the printer settings. Note: This setting is only enabled if you’re printing more than one (1) page. Your printer must be set up to print two-sided.
|
| Delivery Instruction | List |
Required, if Printer ID is selected. Examples of options which allow you to either send items to the printer:
Depending on your setup, you might have additional or different options. See the Task Scheduler for more information on configuring other delivery instructions. |
| Redcard Translation ID | Text box | If using Redcard printer, this field indicates file transformation rules, such as how to bill the document, the number of pages, and where the address needs to be located on the template. Add the translation ID to the template configuration so you can use different translation IDs or override a translation ID if needed. |
| Pages | Text box | Enabled for the Multi Tray option.The page number(s) to print. Enter a number or select the check box to enter a page range. |